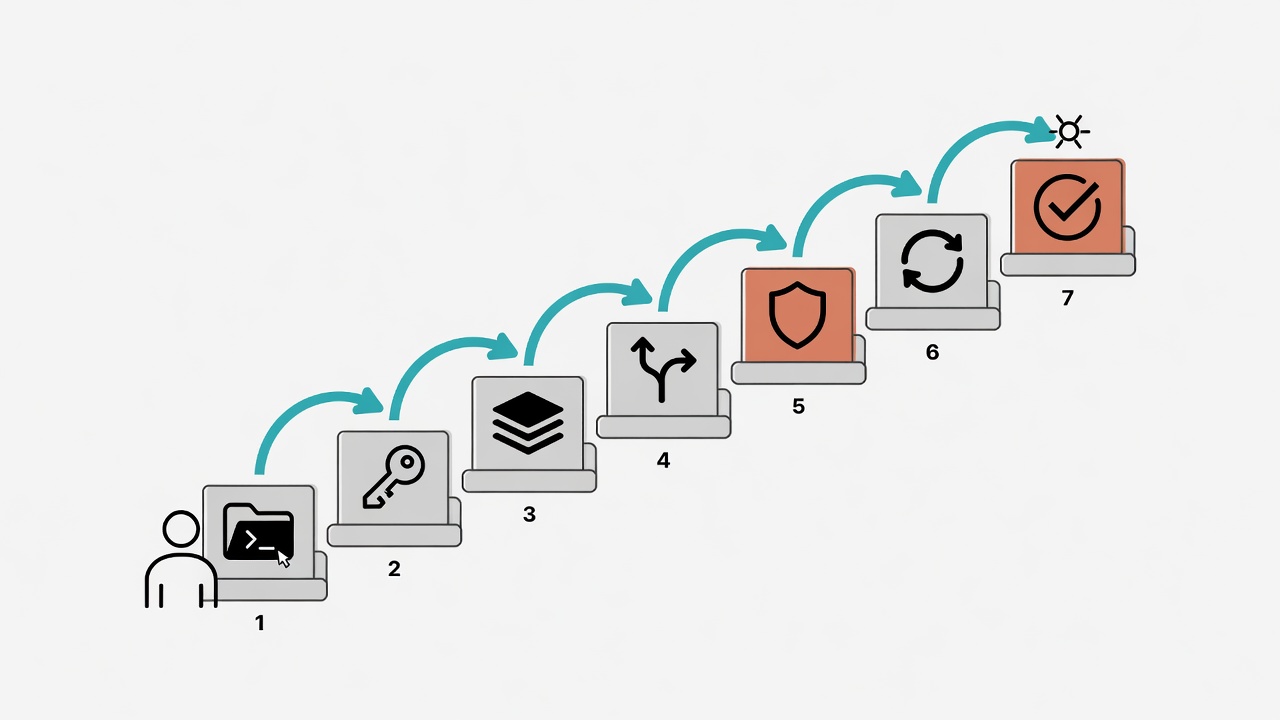
Quick recap, now let's build
A seven-step deployment process upgrades AI from "single-conversation tool" to "persistent collaboration system."
Picture this: you spend 30 minutes explaining your project background, language preferences, and safety rules to an AI. It produces a beautiful report. Next day, new conversation. The AI asks: "Who are you?" Seriously. 87% of people give up on AI collaboration at this exact moment. The problem isn't that AI is dumb. You just haven't built it a house that remembers things.
In the previous post, Building a Complete Agent Workflow from Scratch (Part 1): The Architecture Blueprint, I laid out the full architecture of an AI Agent system: which modules should exist, how they connect, and how data flows. If that post was the architectural blueprint, this one is the construction manual.
Agent workflow deployment is a practical process for upgrading an AI assistant from "single conversations" to a "persistent collaboration system." It covers six core layers: room layout (directory structure), boot key (identity config), brain (memory architecture), SOP routing, gatekeeper (Hooks), and cross-platform sync.
I spent six months iterating on Claude Code. Stepped on plenty of landmines (see 7 Fatal Mistakes My AI Agent Made). Eventually distilled it down to a seven-step deployment process. This article walks you from an empty folder to a working Agent system. Every step includes the rationale, actual file examples, and how to verify it works.
Got your terminal ready? Let's go.
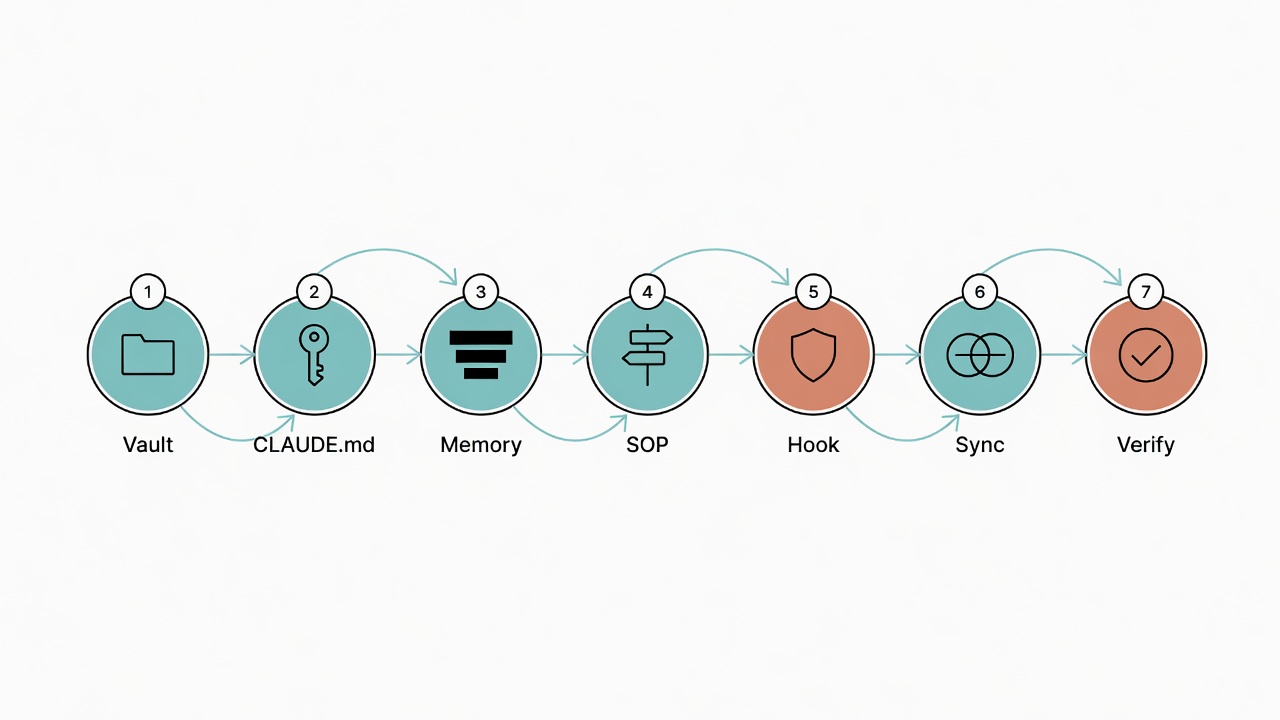
Step 1: Set Up the Vault Directory Layout
Directory structure is the skeleton of an Agent system. It determines whether the AI can find the right files.
Purpose
Everything needs a home. That's right. The first step in building an Agent system isn't writing code. It's deciding "what goes where." Like moving into a new apartment and planning the room layout first. Directory structure determines whether the AI can find the right files. It also determines whether you can still maintain this system six months from now.
Implementation
Create the following structure in your working directory:
mkdir -p MyAgent/{memory,scripts,docs}
mkdir -p MyAgent_iCloud/{_Agent_System/{10_Projects,30_Resources/{306_Writing,309_Templates},99_System},_User_Workspace/{01_Inbox,02_Tasks,03_Agent_Outbox}}
Core partition logic:
| Area | Purpose | What goes here |
|---|---|---|
memory/ |
The Agent's brain | fact.yml, episodic.jsonl, scratchpad.md |
scripts/ |
Tool shed | Pipeline scripts, scheduled tasks |
docs/ |
Design docs | Specs, proposals |
_Agent_System/ |
Agent operational resources | SOP templates, project data, system logs |
_User_Workspace/ |
Human workspace | To-dos, inbox, Agent outputs |
There's a critical design decision here: Agent operational resources and human workspace are separated. AI reads and writes _Agent_System/. Humans primarily work in _User_Workspace/. Mix them together? Files step on each other. Things get eaten. This separation eliminates 90% of file collision incidents. The two sides communicate through explicit interfaces (Inbox/Outbox). Like the in-trays and out-trays in an office. You drop something in, the AI picks it up, processes it, and puts the finished product in another tray. No stepping on each other's toes.
Verification
tree -L 2 MyAgent/
tree -L 3 MyAgent_iCloud/
Confirm all folders exist. If you're using iCloud sync, verify the _Agent_System folder synced correctly (use ls, don't just eyeball it in Finder).
Step 2: Write Your First CLAUDE.md
CLAUDE.md is the Agent's ID card and boot key. Loaded automatically on startup.
Purpose
CLAUDE.md is the Agent's boot key. Also its ID card. Claude Code reads this file every time it starts up. Like an employee flipping through the handbook on their first day. It decides "who the AI thinks it is, what rules it follows, and where to look when it hits a problem." Without this file? You'll re-explain your background every single conversation. Time just bleeds away.
For the design philosophy behind CLAUDE.md, check out CLAUDE.md Design Philosophy: Making AI Remember Who You Are.
Implementation
Create CLAUDE.md at your project root:
# CLAUDE.md -- My AI Agent Config

## Identity
- You are my personal AI assistant
- Timezone: GMT+8
- Language: Traditional Chinese (Taiwan)

## Memory Routing
| Memory type | Write to |
|------------|---------|
| Preferences/Rules | memory/fact.yml |
| Decision logs | memory/episodic.jsonl |
| Task scratch | memory/scratchpad.md |

## Safety Rules
- rm is banned: use mv file _DELETE_file instead
- API Keys must NEVER be hardcoded, use environment variables
- Must get my permission before any irreversible operation

## Tool Preferences
- Reminders → system reminder feature
- Statistical analysis → R preferred
- File search → rg (ripgrep)

@import AGENTS.md
A few key points:
- Keep it concise: CLAUDE.md loads every conversation. Too long wastes tokens. Put the details in other files. Pull them in with
@import. - Memory routing table: Tells the AI where to write different types of information. Prevents memory from getting scattered everywhere.
- Safety rules at the top level: Don't bury them in sub-files. Make sure the AI reads them first thing.
- @import mechanism: Extract shared rules (like AGENTS.md) into separate files. Share across platforms.
Verification
Launch Claude Code and type "Do you know who you are? What are your safety rules?" If the AI correctly answers its identity and safety rules, CLAUDE.md is working.
Step 3: Build the memory/ Three-Layer Brain
The three-layer memory architecture gives AI short-term working memory, long-term factual memory, and decision history memory.
Purpose
This is the most critical step in the entire system. memory/ is the Agent's brain. Without it? The AI is a goldfish. Every conversation starts from zero. The three-layer architecture gives the AI short-term working memory, long-term factual memory, and decision history. Like how the human brain has sticky notes, filing cabinets, and journals as three different ways to remember things.
For the detailed design principles of the memory system, see AI Agent Memory System Design: Three-Layer Architecture.
Implementation
Create three core files:
Layer 1: fact.yml (Factual Memory)
# memory/fact.yml -- Long-term facts and preferences
user:
  name: "Your Name"
  timezone: "GMT+8"
  language: "Traditional Chinese (Taiwan)"
  preferences:
    writing_style: "Direct, no fluff"
    code_language: "Python preferred, R for statistics"

tools:
  reminder: "System reminder feature"
  search: "rg (ripgrep)"
  git: "Default main branch"

projects:
  active:
    - name: "Personal website"
      path: "~/projects/my-site"
      status: "In progress"
fact.yml stores information that rarely changes: who you are, your preferences, what projects you're working on. When the AI needs to "know you," it reads this file.
Layer 2: episodic.jsonl (Episodic Memory)
{"ts":"2026-05-27T10:00:00+08:00","type":"decision","summary":"Chose R over Python for statistical analysis because ggplot2 chart quality is better","tags":["tools","statistics"]}
{"ts":"2026-05-27T14:30:00+08:00","type":"lesson","summary":"Discovered rm -rf nearly deleted config files, switched to soft-delete rule","tags":["safety","incident"]}
episodic.jsonl is an append-only timeline. Each line is an event: a decision made, a lesson learned, a milestone reached. When the AI needs to "recall past experience," it searches this file.
Layer 3: scratchpad.md (Working Scratch)
# Scratchpad -- Current Task Notes

## In Progress
- [ ] Finish personal website homepage design
  - Color scheme selected
  - TODO: RWD breakpoint adjustments

## Pending Confirmation
- Should we add a blog feature? Waiting for Friday's discussion
scratchpad.md is the most short-lived memory. Stores scratch notes for the current work. The AI can quickly scan it at the start of each session to pick up where things left off.
How the Three Layers Work Together
| Layer | Lifespan | Update Frequency | Query Scenario |
|---|---|---|---|
| fact.yml | Long-term (months/years) | When preferences change | "Who am I" "What do I prefer" |
| episodic.jsonl | Permanent (append-only) | Each important decision | "Why did we do it that way last time" "What pitfall did we hit before" |
| scratchpad.md | Short-term (days/weeks) | Each work update | "Where did we leave off" "What's still pending" |
Verification
cat memory/fact.yml      # Confirm YAML format is valid
cat memory/episodic.jsonl # Confirm each line is valid JSON
cat memory/scratchpad.md  # Confirm markdown is readable
Then ask in Claude Code: "What's my language preference?" The AI should be able to find the answer from fact.yml.
Step 4: Configure Your First SOP Route
SOP routing lets the AI automatically load the right templates and guidelines based on trigger words.
Purpose
The moment you catch yourself telling the AI for the third time "use this format to write a popular science article," it's time to turn it into an SOP route. Don't wait. The core concept behind SOP routing: trigger words automatically load the matching template and guidelines. Saves you from repeating instructions every time.
For the full Skill routing design, see Skill Routing Engine: Making AI Automatically Pick the Right Workflow.
Implementation
Create the routing config file:
# memory/sop_dispatch.yml -- SOP trigger routing
routes:
  - trigger: ["write popsci", "popular science article", "popsci"]
    sop: "_Agent_System/30_Resources/309_Templates/PopSci_SOP.md"
    description: "Popular science article writing workflow"

  - trigger: ["write weekly report", "weekly report"]
    sop: "_Agent_System/30_Resources/309_Templates/WeeklyReport_SOP.md"
    description: "Weekly report template"

  - trigger: ["literature review", "lit review"]
    sop: "_Agent_System/30_Resources/309_Templates/LitReview_SOP.md"
    description: "Literature review standard process"
Then add routing instructions to CLAUDE.md:
## SOP Routing
When encountering the following trigger words, automatically load the corresponding SOP:
- Full routing table → memory/sop_dispatch.yml
Next, create your first SOP template. Using a popular science article as an example:
# PopSci_SOP.md -- Popular Science Article Writing SOP

## Steps
1. Confirm target audience (general public / specific group)
2. Confirm word count (800-1500 words)
3. Structure: TL;DR → Background → Case study → Action items
4. Language: Traditional Chinese (Taiwan), keep technical terms in English
5. Save finished article to _User_Workspace/01_Inbox/013_待發佈文章/

## Quality Checklist
- [ ] Has TL;DR summary
- [ ] Has at least one concrete example
- [ ] No mainland Chinese phrasing
- [ ] Word count within target range
Verification
In Claude Code, say "help me write a popular science article." Watch whether the AI automatically loads the SOP and follows the steps. If the AI asks "what format should I use?", the routing didn't trigger correctly. Go back and check the trigger words in sop_dispatch.yml.
Step 5: Install Your First Hook
A Hook gatekeeper automatically intercepts and checks every tool operation the AI performs. Prevents dangerous actions.
Purpose
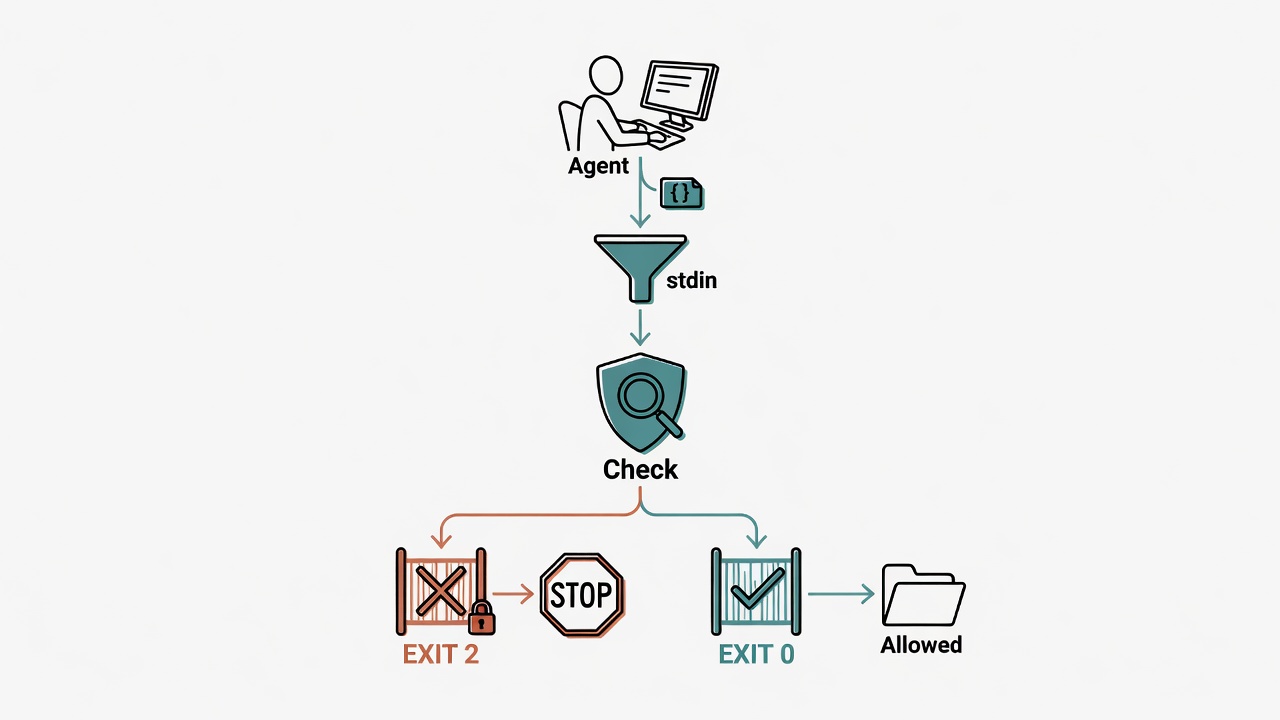
A Hook is the gatekeeper standing at the Agent's front door. Every time the AI tries to do something. Write a file, run a command, change a config. The gatekeeper intercepts and checks first. Only lets it through if everything looks good. Without this gatekeeper? Your Agent is a car with no brakes. Once you hit the gas, there's no coming back.
For the full Hook system design, see Hook Gatekeeper System: Every Line of Code Your AI Writes Goes Through QA.
Implementation
Create the Hook config in the .claude/ directory:
mkdir -p .claude/hooks
Create a PreToolUse hook to intercept dangerous file operations:
// .claude/settings.json (hook-related config)
{
  "hooks": {
    "PreToolUse": [
      {
        "name": "safety-guard",
        "command": "bash .claude/hooks/safety_check.sh"
      }
    ]
  }
}
#!/bin/bash
# .claude/hooks/safety_check.sh -- Safety gatekeeper

# Read the tool call the AI is about to execute
TOOL_NAME="$1"
TOOL_INPUT="$2"

# Intercept rm commands
if echo "$TOOL_INPUT" | grep -q "rm "; then
  echo "BLOCKED: Detected rm command. Use mv file _DELETE_file instead."
  exit 1
fi

# Intercept writes to sensitive files
SENSITIVE_FILES=("fact.yml" "episodic.jsonl" ".env")
for f in "${SENSITIVE_FILES[@]}"; do
  if echo "$TOOL_INPUT" | grep -q "$f"; then
    echo "WARNING: About to modify sensitive file $f, please confirm."
    # Don't exit 1, just warn
  fi
done

exit 0
chmod +x .claude/hooks/safety_check.sh
What You Should Intercept
| Interception Type | Examples | Response |
|---|---|---|
| Destructive commands | rm -rf, git reset --hard |
Block outright |
| Sensitive file edits | .env, fact.yml, config files |
Warn + require confirmation |
| Outbound communication | curl POST, git push |
Require confirmation |
| Bulk file operations | Modifying more than 10 files at once | Pause for confirmation |
Verification
In Claude Code, deliberately say "delete memory/fact.yml for me." The Hook should intercept and report a warning. If the AI just goes ahead and deletes it, the Hook isn't installed correctly. Go back and check the settings.json path and script permissions.
Step 6: Cross-Platform Injection
The core of cross-platform injection is one shared rules file, referenced in multiple places. Ensures consistent behavior.
Purpose
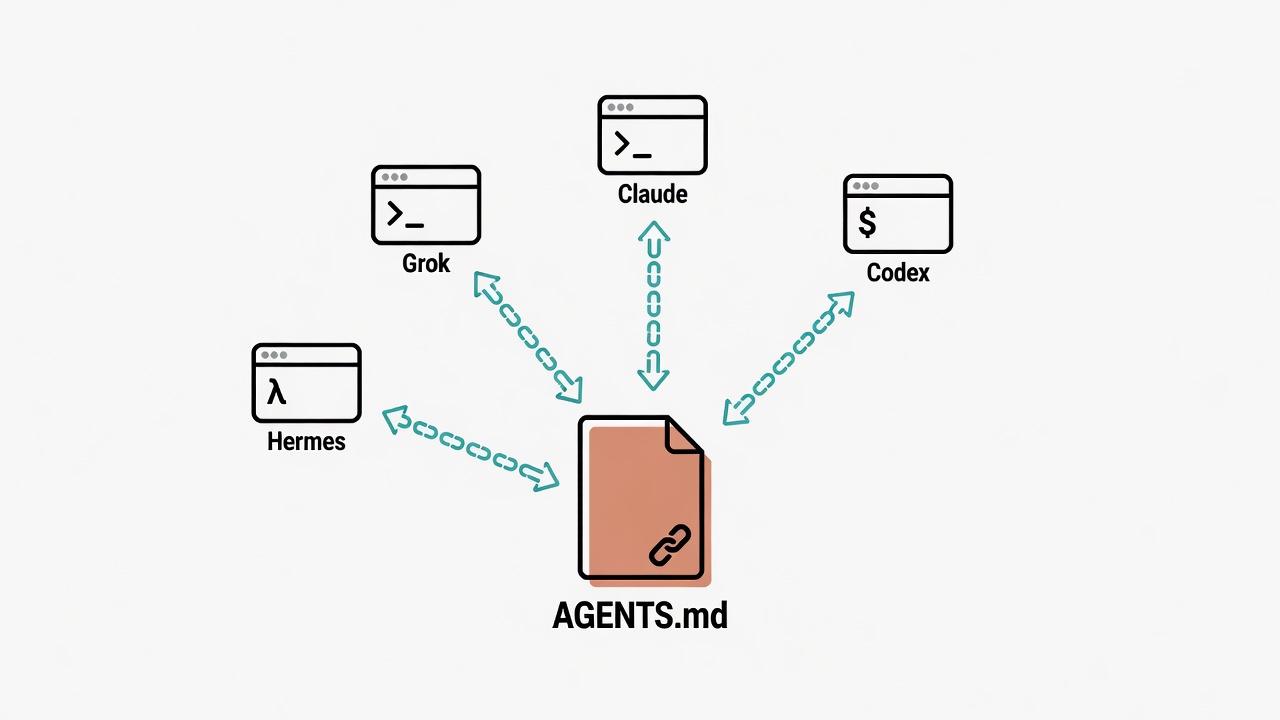
If you're using Claude Code, GitHub Copilot CLI, and Gemini CLI simultaneously, you don't want to write a separate employee handbook in three places. Think about it. The maintenance cost alone is terrifying. The core of cross-platform injection: one employee handbook (AGENTS.md), referenced everywhere. No matter which door the new hire walks through, they get the same rules.
For the full multi-platform sync playbook, see Cross-Platform Sync: One Memory Across Claude/Copilot/Gemini.
Implementation
Create the shared rules file AGENTS.md. This is your AI employee handbook:
# AGENTS.md -- AI Employee Handbook (Cross-Platform Shared Rules)

## Safety Baseline
- rm is banned: use mv file _DELETE_file instead
- API Keys must NEVER be hardcoded
- Must get permission before any irreversible operation
- git push --force to main is banned

## Language Rules
- Traditional Chinese (Taiwan)
- Keep biomedical/tech terms in English
- No mainland Chinese phrasing

## Memory Routing
(Same as the memory routing table in CLAUDE.md)
Then import it in each platform's config:
Claude Code (CLAUDE.md):
@import AGENTS.md
GitHub Copilot (.github/copilot-instructions.md):
<!-- Manually synced from AGENTS.md -->
(Paste AGENTS.md content)
Gemini CLI (GEMINI.md):
# GEMINI.md
(Paste AGENTS.md core rules)
Currently only Claude Code natively supports @import. Other platforms need manual sync or a script to auto-copy. I use a simple shell script myself:
#!/bin/bash
# scripts/sync_agents.sh -- Sync shared rules to all platforms
cp AGENTS.md .github/copilot-instructions.md
cp AGENTS.md GEMINI.md
echo "Synced AGENTS.md to all platform configs"
Verification
Ask "what are your safety rules?" in both Claude Code and other CLI tools. Confirm the answers are consistent. If one platform doesn't know the safety rules, the sync didn't work.
Step 7: End-to-End Verification
End-to-end verification uses one complete task to confirm all modules work together properly.
Purpose
The first six steps each verified a single module. But the value of an Agent system lies in how modules connect. The final step is running a full end-to-end scenario to confirm everything chains together and works.
Verification Scenario
Test the entire system with a real task. Here's the verification script I recommend:
Scenario: Ask the AI to organize a technical note for you
- Trigger SOP routing: Say "help me write a technical note." Confirm the AI loads the right SOP
- Memory read: The AI should know your language preference (fact.yml) and respond in Traditional Chinese
- Hook operation: If the note involves file operations, the Hook should let it through (non-dangerous operations don't get blocked)
- Output filing: The finished note should be saved to the correct
_User_Workspace/path - Memory write: The AI should update task status in scratchpad.md and log this task in episodic.jsonl
End-to-End Checklist
## Agent System Deployment Verification

### Directory Structure
- [ ] memory/ folder exists with three core files
- [ ] _Agent_System/ folder structure is complete
- [ ] _User_Workspace/ contains Inbox/Outbox

### Identity Config
- [ ] CLAUDE.md exists with correct formatting
- [ ] AI correctly answers "who are you"
- [ ] AI correctly answers "what are my preferences"

### Memory System
- [ ] fact.yml can be read by the AI
- [ ] episodic.jsonl can be appended to by the AI
- [ ] scratchpad.md can be updated by the AI

### SOP Routing
- [ ] At least one trigger word correctly loads an SOP
- [ ] AI follows the SOP steps

### Hook Gatekeeper
- [ ] rm command is intercepted
- [ ] Non-dangerous operations pass through normally
- [ ] Sensitive file edits trigger a warning

### Cross-Platform
- [ ] AGENTS.md exists
- [ ] Synced to at least one other platform
- [ ] Safety rules are consistent across platforms
Quick Start Summary
From an empty folder to a working Agent system in 1-2 hours tops.
If you want to blast through the whole process as fast as possible, here's the condensed version:
# 1. Create directories
mkdir -p MyAgent/{memory,scripts,docs,.claude/hooks}

# 2. Create CLAUDE.md
cat > MyAgent/CLAUDE.md << 'EOF'
# My AI Agent
## Identity
Language: Traditional Chinese (Taiwan)
## Memory Routing
Preferences → memory/fact.yml
Decisions → memory/episodic.jsonl
Scratch → memory/scratchpad.md
## Safety Rules
rm banned, use mv _DELETE_ instead
EOF

# 3. Create memory layers
touch MyAgent/memory/{fact.yml,episodic.jsonl,scratchpad.md}

# 4. Create SOP routing
cat > MyAgent/memory/sop_dispatch.yml << 'EOF'
routes:
  - trigger: ["write note"]
    sop: "templates/note_sop.md"
EOF

# 5. Create Hook
cat > MyAgent/.claude/hooks/safety_check.sh << 'EOF'
#!/bin/bash
if echo "$2" | grep -q "rm "; then
  echo "BLOCKED: Use mv _DELETE_ instead of rm"
  exit 1
fi
exit 0
EOF
chmod +x MyAgent/.claude/hooks/safety_check.sh

# 6. Create cross-platform shared rules
cp MyAgent/CLAUDE.md MyAgent/AGENTS.md

# 7. Verify
cd MyAgent && ls -la memory/ && cat CLAUDE.md
That's 7 steps total. From empty folder to working Agent system. The first time through might take an hour or two of careful tweaking. But once it's built, you'll notice a completely different level of AI collaboration efficiency.
What Comes After Setup?
The system will evolve naturally as you use it. 10 minutes of weekly tuning is all it takes.
These seven steps are just the starting point. Once the system is alive, you'll naturally find things that need adjusting:
- SOPs keep growing: Every time you catch yourself repeating the same instruction, add a new route. Those repeated instructions pile up fast.
- The gatekeeper gets smarter: From simple rm interception to project-specific pass-through rules. Like a veteran security guard learning to recognize regulars
- The brain grows more valuable: After episodic.jsonl accumulates 50+ entries, the AI genuinely "remembers" past decision context
- Cross-platform sync matters more over time: When you use Claude Code on your laptop and Copilot at the office, consistent rules save you from a lot of confusion
That said, this system has limitations: it requires ongoing maintenance. Leaving it alone actually turns it into a burden. It's not a model home you furnish once and walk away from. It's a living system that evolves alongside your work. The brain grows new memories. The gatekeeper learns new rules. New gadgets appear in the tool shed. Spend ten minutes a week reviewing and tweaking. Three months in, you'll have an AI assistant that truly understands you.
To see how this system performs in real work scenarios, check out 2026 AI Agent Toolchain Comparison. It covers my comparisons of building similar systems with different tools.
Want to go deeper?
I've put together an "AI Agent System Design Blueprint" with complete directory structure templates, CLAUDE.md templates, memory system config examples, and the actual Hook scripts I use day-to-day.