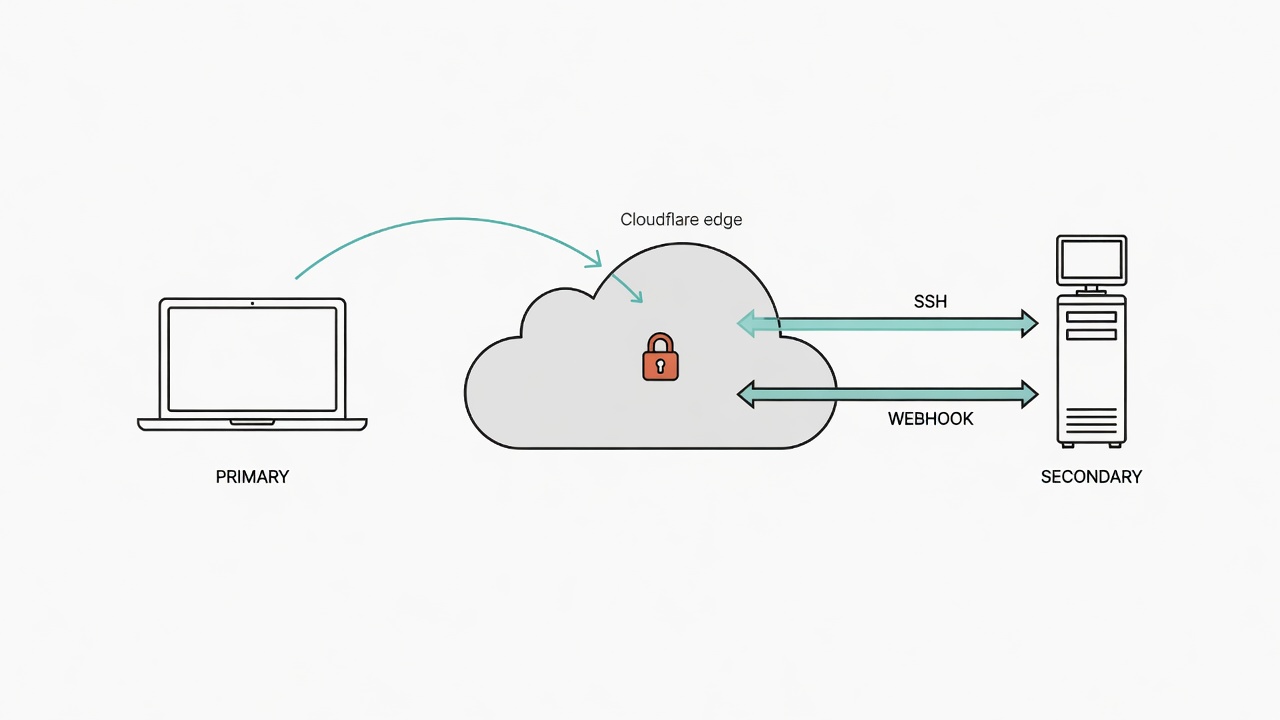
Your MacBook is running AI Agents, while the iMac at home sits idle with 48GB of memory and fans quietly blowing cold air. Can it join the work too?
This article records how I used Cloudflare Tunnel plus Zero Trust Access to turn an M1 iMac into an "extension handset" for my AI system. It can be driven over SSH from afar, and it can independently receive LINE Bot Webhook requests. The whole setup is free. Because traffic rides a Tunnel, you do not need a static IP, and you do not open extra ports on the router.
Why multi-device?
Running AI Agents on a single machine hits a ceiling sooner or later. My situation looked like this:
- Split compute: the MacBook owns the main Claude Code workflow; the iMac runs Ollama local models and the Hermes gateway service; each does its job
- Service separation: the LINE Bot Webhook needs a stable public endpoint. Putting it on the iMac means the channel does not die when the MacBook lid closes and the machine sleeps
- Redundancy: if one machine fails, the other can still keep basic services alive
The catch is that both machines sit behind home-network NAT. Stuck behind NAT, nothing from the outside can reach in, and the primary host cannot reliably reach the extension whenever it needs to. The classic fix is port forwarding, but that wants a static IP, router config changes, and one more open port for every new service.
Cloudflare Tunnel solves this. It opens an encrypted channel from inside the machine out to a Cloudflare edge node. External traffic then enters through Cloudflare's network. You never expose a port yourself.
Architecture overview
Start with the full picture. This design has two channels, each on its own hostname:
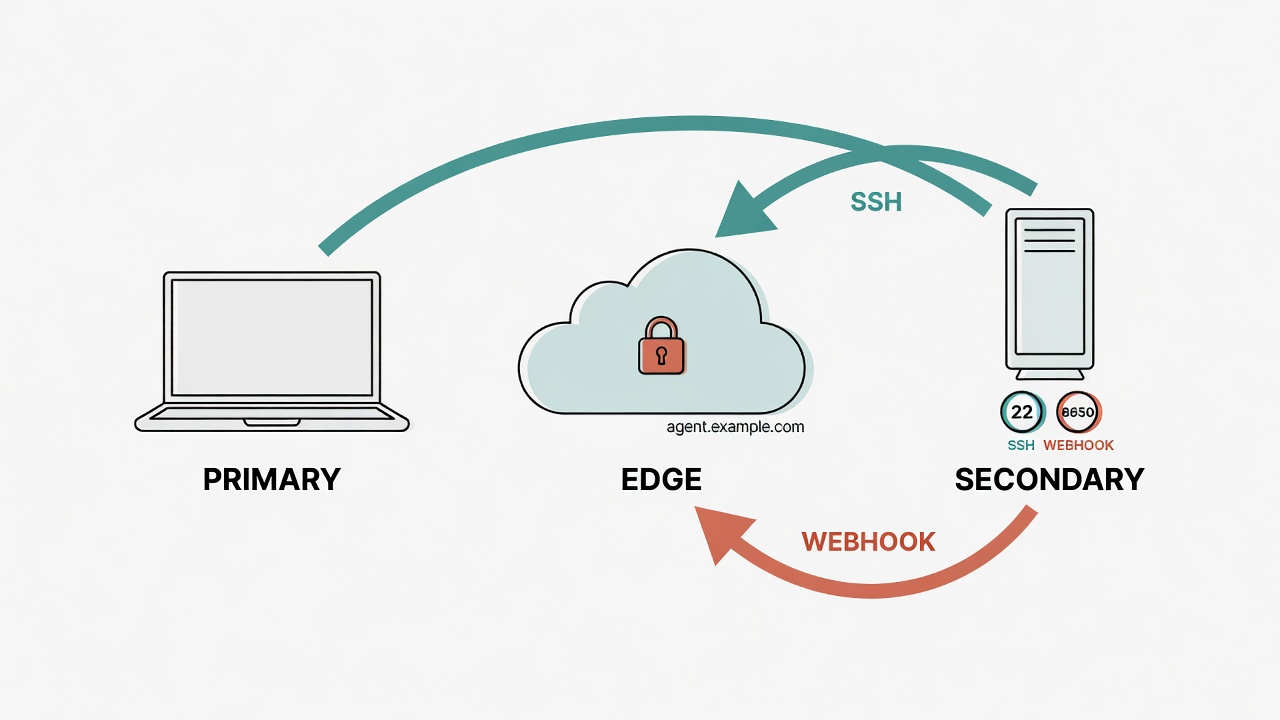
SSH channel (mac-node.example.com):
MacBook (primary host)
    |  ssh + cloudflared access proxy
    v
Cloudflare Edge
    |  Zero Trust Access (identity check)
    v
Cloudflare Tunnel
    |
    v
iMac :22 (SSH, key auth only)
LINE Webhook channel (line-hook.example.com):
LINE platform
    |  POST /line/webhook
    v
Cloudflare Edge
    |  Zero Trust Access (path-based split)
    v
Cloudflare Tunnel
    |
    v
iMac :8650 (Hermes Gateway, HMAC signature check)
Both channels share one Tunnel. In the config, different hostnames map to different local services. SSH uses port 22; the LINE Webhook uses port 8650. Each path is split cleanly.
Five steps to build the Tunnel
The steps below run on the iMac (the extension side). Install cloudflared and log in, pick your Cloudflare account and your own domain in the browser (this article always uses example.com as a placeholder). Create a tunnel (shown here as mac-node), route both hostnames onto that tunnel, write the settings into config.yml, then install it with launchd as a boot-time service. The credentials JSON lands under ~/.cloudflared/. That file is the Tunnel's identity proof; keep it safe.
The flow skeleton is roughly: tunnel create → route dns (two hostnames) → write ingress → service install and load launchd. Exact flags follow the official docs. Below I keep only the key config sketch:
# ~/.cloudflared/config.yml (sketch)
tunnel: <TUNNEL_ID>
credentials-file: /Users/youruser/.cloudflared/<TUNNEL_ID>.json

ingress:
  - hostname: mac-node.example.com
    service: ssh://localhost:22
  - hostname: line-hook.example.com
    service: http://localhost:8650
  - service: http_status:404
The final ingress line http_status:404 is a required catch-all: every request that matches nothing falls here. After DNS routing is done, Cloudflare creates CNAMEs for both hostnames that point at this Tunnel. Once the service is installed, the iMac pulls the Tunnel up automatically on boot.
Remember to add the primary host's SSH public key to the extension's ~/.ssh/authorized_keys, and tighten directory and file permissions so only the local user can read and write them.
Three security hardening steps
After the Tunnel is up, your machine is reachable from the global internet. That fact matters enough to say twice: Cloudflare Tunnel takes your machine out of the invisible state behind NAT. Security measures are not "nice to have". They are required.
Step one: disable SSH password authentication
sudo tee /etc/ssh/sshd_config.d/hardening.conf << 'EOF'
PasswordAuthentication no
ChallengeResponseAuthentication no
KbdInteractiveAuthentication no
EOF
# After edits, reload sshd (on macOS: launchctl unload/load ssh.plist)
Why harden a home machine too? Brute-force bots do not care where you live. The moment a public SSH endpoint exists, they start trying within minutes. Keep only key authentication and password attacks fail immediately. When verifying, you can deliberately turn off public-key auth, leave password on, and try once; you should get Permission denied (publickey).
Step two: set StrictHostKeyChecking to yes
alias ssh-macnode='ssh \
    -o ProxyCommand="cloudflared access ssh --hostname mac-node.example.com" \
    -o StrictHostKeyChecking=yes \
    -i ~/.ssh/id_ed25519 \
    youruser@mac-node.example.com'
Many tutorials tell you to set StrictHostKeyChecking=no to "avoid hassle". That is the same as giving up man-in-the-middle (MITM) protection. In practice, confirm the host fingerprint on the first connect and you are done after that.
Step three: Zero Trust Access path-based split
This is the interesting part. line-hook.example.com has to serve two roles at once: the LINE platform posting Webhooks, and me occasionally checking status. Their security needs are totally different, so they must be handled separately.
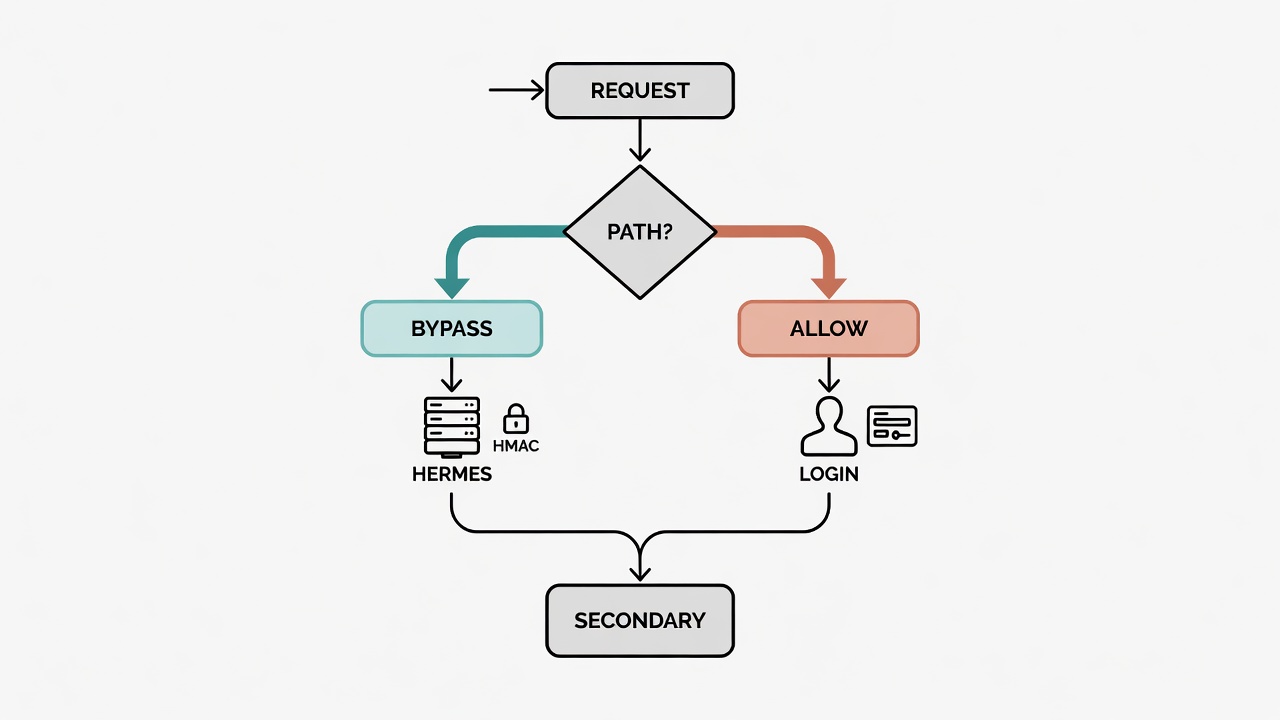
Create an Access Application in the Cloudflare Zero Trust console:
| Setting | Value |
|---|---|
| Hostname | line-hook.example.com |
| Policy 1 | Bypass / Everyone / path: /line/webhook |
| Policy 2 | Allow / specified users (myself) |
With that layout, when the LINE platform hits /line/webhook the request is allowed through (Hermes gateway HMAC signature check is the second layer). Every other path needs Cloudflare identity authentication before access.
SSH (mac-node.example.com) also gets an Access Application, reusing the same Allow policy. On first connect, cloudflared access ssh opens a browser for login. The verification token is cached for a while; on my side it lasted about a week in practice, and the real length depends on the session duration in your Access policy. After that, the ssh-macnode alias connects directly without repeating login.
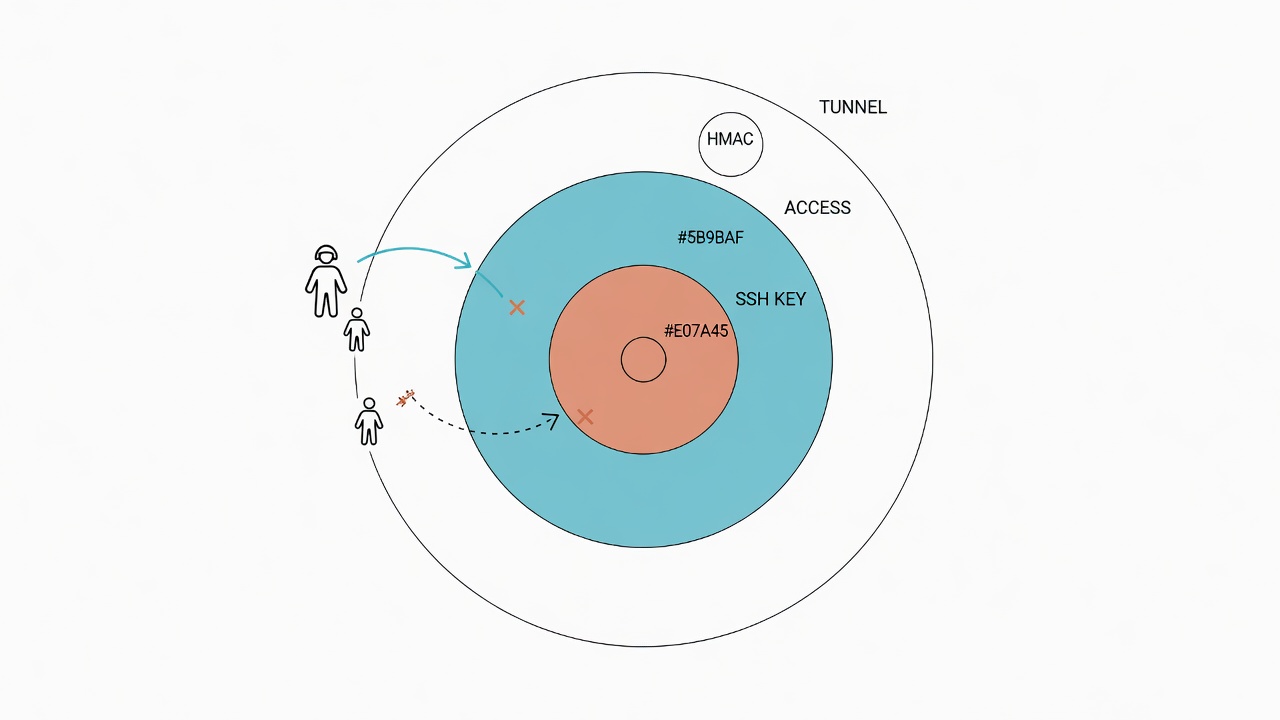
Effect of the two-layer shield:
attacker
  -> Cloudflare Access (no token, reject immediately)
      -> SSH key auth (no ed25519 key, reject again)
To break through, someone needs both my Cloudflare account and my SSH private key at the same time. Those two secrets do not live in the same place, so simultaneous compromise is very unlikely.
Failure note: wrong Bypass path
The most frustrating pit during setup: the LINE Bot Webhook suddenly stopped receiving messages.
Symptom: Webhook requests from the LINE platform were intercepted by Cloudflare Access and returned a 302 redirect to the login page. The LINE platform does not log in, so every Webhook failed.
Root cause: I set the Bypass path to /webhook/line because Hermes config uses webhook_path with that value. The path LINE actually posts to is /line/webhook. The path was reversed.
Fix: change the Bypass path in the Zero Trust console to /line/webhook.
Verification:
# Should pass Access and reach Hermes (401 is common without a valid signature)
curl -s -X POST https://line-hook.example.com/line/webhook \
    -H "Content-Type: application/json" -d '{"probe": true}'
If the Webhook path returns 401 instead of 302, the request has successfully passed Cloudflare Access and reached the Hermes gateway. If Access intercepts the root path, it usually redirects to login (302). You can compare that with the Webhook path to diagnose. Problem solved.
The lesson from this pit: when you set a Bypass path, always use the path external callers actually hit, not the path your internal app config claims. The two can differ.
Primary-host operator interface
Once everything is ready, driving the iMac from the MacBook feels close to working locally. Use ssh-macnode for an interactive shell; hang a one-shot command after the alias for single commands. Checking whether Hermes is listening on 8650, or reloading the Tunnel's launchd service, goes through the same alias. Day to day on the iMac itself, use launchctl list to see whether cloudflared is running, and log show to read tunnel logs from the last few minutes.
ssh-macnode
ssh-macnode "whoami && uname -a"
# Check the gateway and reload the Tunnel service: same alias for remote exec
Looking ahead: primary-secondary Agent dialogue
This channel currently does three main things: remote command execution, service management, and file moves. Its real value is that it opens a larger possibility.
If Claude Code is also installed on the iMac, you can form a true primary-secondary Agent architecture:
workspace (Claude Code, primary)
    |  SSH Tunnel
    v
second Mac (Claude Code, secondary)
    |
    +-- Ollama local model inference
    +-- Hermes LINE Bot gateway
The Agent on the primary host can hand specific inference jobs over SSH to the local model on the extension, or ask the extension Agent to take work that needs long compute. Because the extension only does assigned work and does not actively write shared resources, conflicts stay rare.
It is like a phone extension system in an office. The switchboard answers and assigns tasks; each extension handles its own workload. The difference is that these "extensions" are AI Agents, and the "phone line" is an encrypted channel across Cloudflare's global network.
That direction did get built out. For agents sharing one machine, letting Claude Code and Codex type to each other over tmux-bridge-mcp covers the read-write bridge and the security review it needs; pushing further into auditable cross-machine dispatch, letting agents assign tasks to each other is where that ended up.
Security model summary
Finally, restate the security layers so each layer owns a clear job:
| Layer | Protects | Mechanism |
|---|---|---|
| Layer 1 | Network access | Cloudflare Tunnel (no ports exposed) |
| Layer 2 | Identity | Zero Trust Access (Cloudflare account login) |
| Layer 3 | SSH authentication | ed25519 keys (password disabled) |
| Layer 4 | Application auth | Hermes HMAC signature check (LINE Webhook only) |
Four layers, each independent. Because they are independent, even if one layer is bypassed, the layers behind it still stand.
The free tier can do all of this. Cloudflare Tunnel is free, and Zero Trust has a free plan whose seats are enough for individuals or small teams. I will not hard-code exact seat limits here; Cloudflare has adjusted them a few times over the years. Check the official pricing page before you rely on a number.
Turning idle hardware into part of your AI infrastructure does not require buying new servers or wrestling with a complex VPN. One Tunnel maps two hostnames, four layers of protection sit on top, and multi-device Agent collaboration starts from there.