
Your First Disappointment
You installed Claude Code. You tried it. The output looked fine—until it didn't. Type errors, mismatched conventions, tests that don't pass. You spent more time fixing its code than writing your own.
The problem isn't the tool. You never gave it an onboarding.
This article covers seven configuration steps that transform Claude Code from a generic assistant into a personalized weapon. Start with step one—it alone is worth 30 minutes.
Step 1: Write Your CLAUDE.md (Highest Leverage)
CLAUDE.md lives in your project root. Claude reads it at the start of every session—not as a command list, but as background: why your project does things the way it does.
Write "why," not "what." Not "we use TypeScript" but "because we need compile-time type safety, all function parameters must have explicit type annotations." Document your architecture decisions, your pitfall list, and your naming rules. Share the reasoning behind them—not just the rules themselves.
Organize it into layers: global principles, project-specific architecture, directory-level rules, and single-file overrides. Keep the whole file under 200 lines, or Claude starts ignoring it.
ROI: 30 minutes of writing → 40–60% improvement in output quality. This is the highest-leverage step of all seven. Don't skip it.
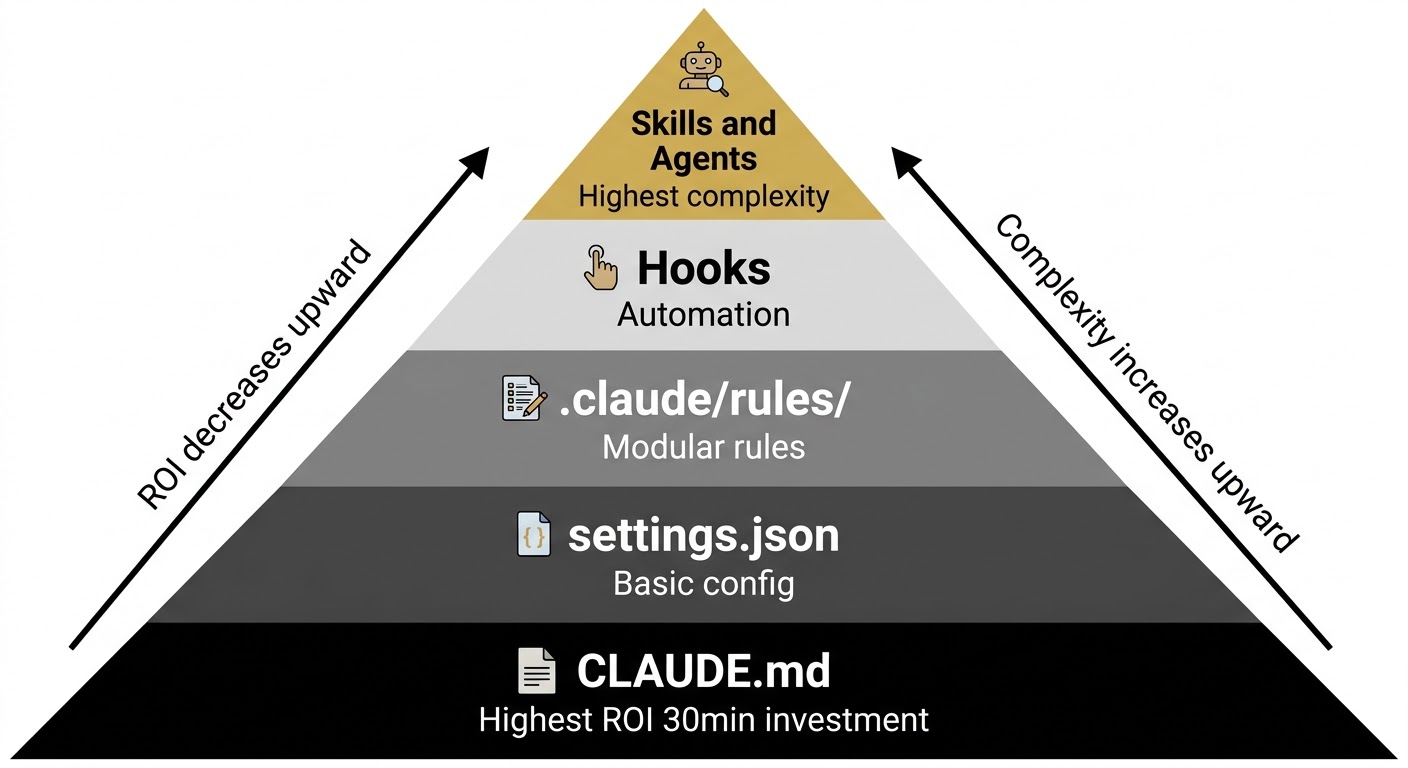
CLAUDE.md is the base. Every layer above multiplies this foundation.
Step 2: Plan Before Execute (Ctrl+G)
Ctrl+G enters Plan Mode. Instead of writing code immediately, Claude shows you a Markdown plan first: what it will do, which files it will touch, where the risks are. You review, edit, add requirements—then press Execute.
Editing a plan takes seconds. Rebuilding a wrong implementation takes hours. Plan Mode shifts you from passive receiver to active director—you decide before Claude acts.
Result: ~45% fewer revision iterations.
Step 3: Sub-agents for Context Isolation
Large projects exhaust your context window fast. A 2GB log file, a 500-message conversation history, a codebase with hundreds of files—any of these can push your main session to its limit.
Sub-agents solve this: isolated Claude instances spin up, handle a focused task (reading logs, analyzing dependencies, searching code), summarize their findings, and hand the result back—without polluting your main conversation.
Configure cheap models (Haiku) for exploratory work, expensive ones (Sonnet) for decisions that matter.
Result: 30–40% reduction in token spend on large projects.
Step 4: Set Permission Boundaries
Claude can execute commands and delete files. Start in Ask mode—Claude prompts before every action. When comfortable, switch to Auto mode: harmless operations proceed automatically, dangerous ones (system changes, data deletion) still get blocked.
Auto Mode's true positive rate for dangerous operations: 99.6%. It eliminates 93% of manual approval fatigue without sacrificing safety.
Step 5: Automate QA with Hooks
Hooks fire at lifecycle moments—before a tool runs, after it runs, when the session ends. Attach shell commands to each.
Example: PostToolUse runs npm test. If tests fail, exit code 2 signals Claude to auto-fix. Stop runs prettier to unify style. Every write is automatically linted, tested, and formatted.
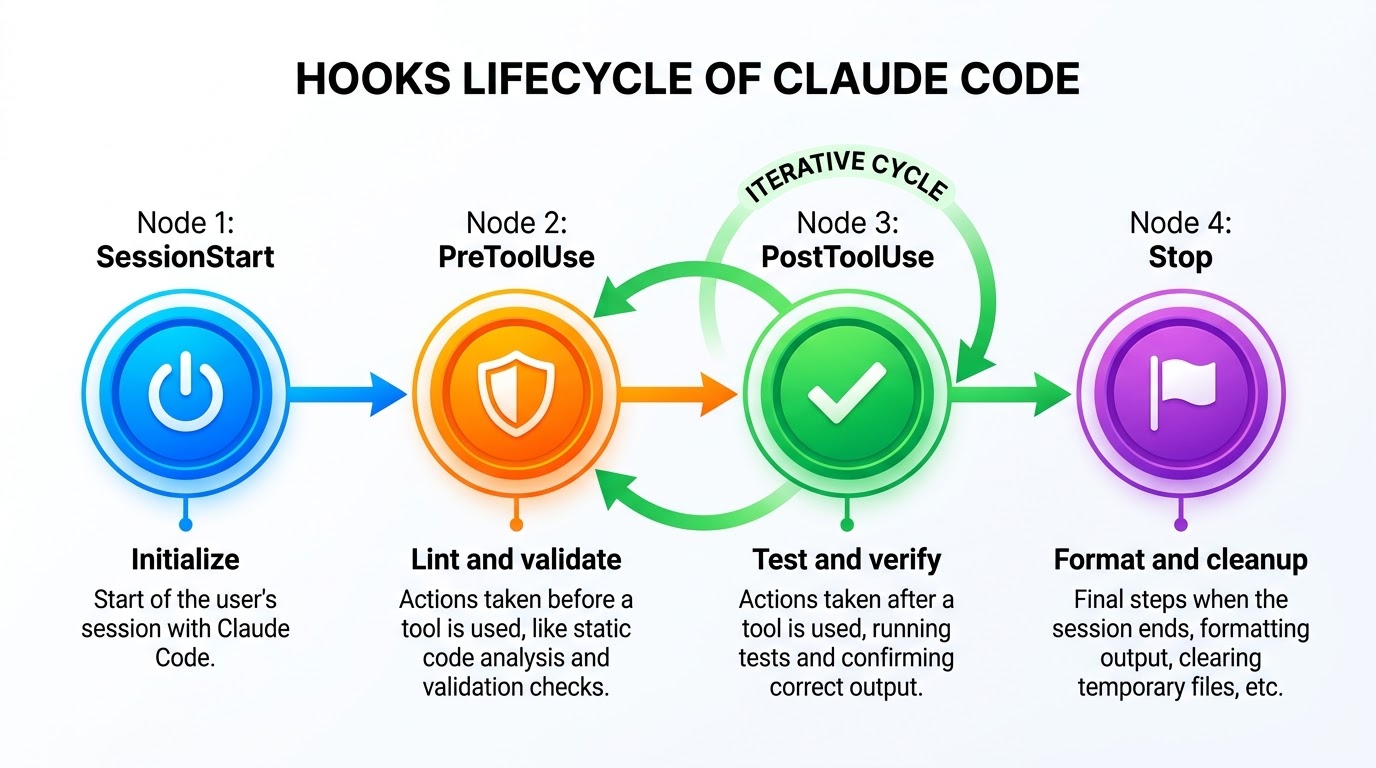
PreToolUse → ToolUse → PostToolUse: quality gates run automatically at every step.
Result: Code review time drops ~60%.
Step 6: Modularize with .claude/rules/
When CLAUDE.md exceeds 200 lines, Claude starts ignoring it. Break it into small rule files under .claude/rules/, each targeting specific paths (react.yaml for src/components/**, api.yaml for src/api/**). Claude loads only the rules relevant to each file it touches.
Result: Saves tokens, speeds response, keeps context clean. Large projects see 30% reduction in context load.
Step 7: Optimize with AutoResearch
Even a well-configured setup has room to improve. Ole Karpathy's AutoResearch method turns configuration into a feedback loop: define a 3–6 item scoring checklist (does the code run? do tests pass? are there security issues?), run 20 baseline tasks, measure the pass rate, identify failure patterns, fix exactly one rule in CLAUDE.md, then repeat.
Each round takes minutes. Each round raises the bar.
Real result: 4 rounds of iteration, ~$15 in Haiku API costs, pass rate 56% → 92%.
Configuration is not a one-time setup. It's a discipline.
The Configuration Pyramid
Seven steps, one structure. CLAUDE.md is the base—30 minutes of setup, 40–60% quality gain. Plan Mode catches misalignment early. Sub-agents protect context. Permissions set boundaries. Hooks automate QA. Modular rules scale. AutoResearch measures and improves.
Most developers buy Claude Code, use it a week, then abandon it. Not because it's bad—because nobody told them it needs tuning.
Now you know how to tune it.
Discussion prompt: Which layer are you missing right now—context (CLAUDE.md), safety (permissions), or feedback loops (Hooks + AutoResearch)?
References
- Anthropic. (2025). Claude Code Best Practices — From 'Works' to 'Works Well'. Official Blog.
- Anthropic. (2025). Claude Code Auto Mode — A Safer Way to Skip Permissions. Official Documentation.
- Karpathy, Ole. (2025). How to 10x Your Claude Skills (AutoResearch Method).